> ## Documentation Index
> Fetch the complete documentation index at: https://docs.chief.bot/llms.txt
> Use this file to discover all available pages before exploring further.
# Adding screenshots and images to a Live Session transcript
> Capture, upload, paste, or drag images into a transcript while a Live Session is recording.
Add screenshots and images while a [Live Session](/help/meetings-live-sessions/what-are-live-sessions) is recording to preserve the visual context behind the conversation. Chief places each image at the current point in the [transcript](/help/meetings-live-sessions/how-transcription-works-speaker-attribution), so teammates and AI agents can see what you were discussing.
 ## Take a screenshot
1. Start a Live Session in the [Chief Live Sessions App](/help/meetings-live-sessions/starting-a-live-session).
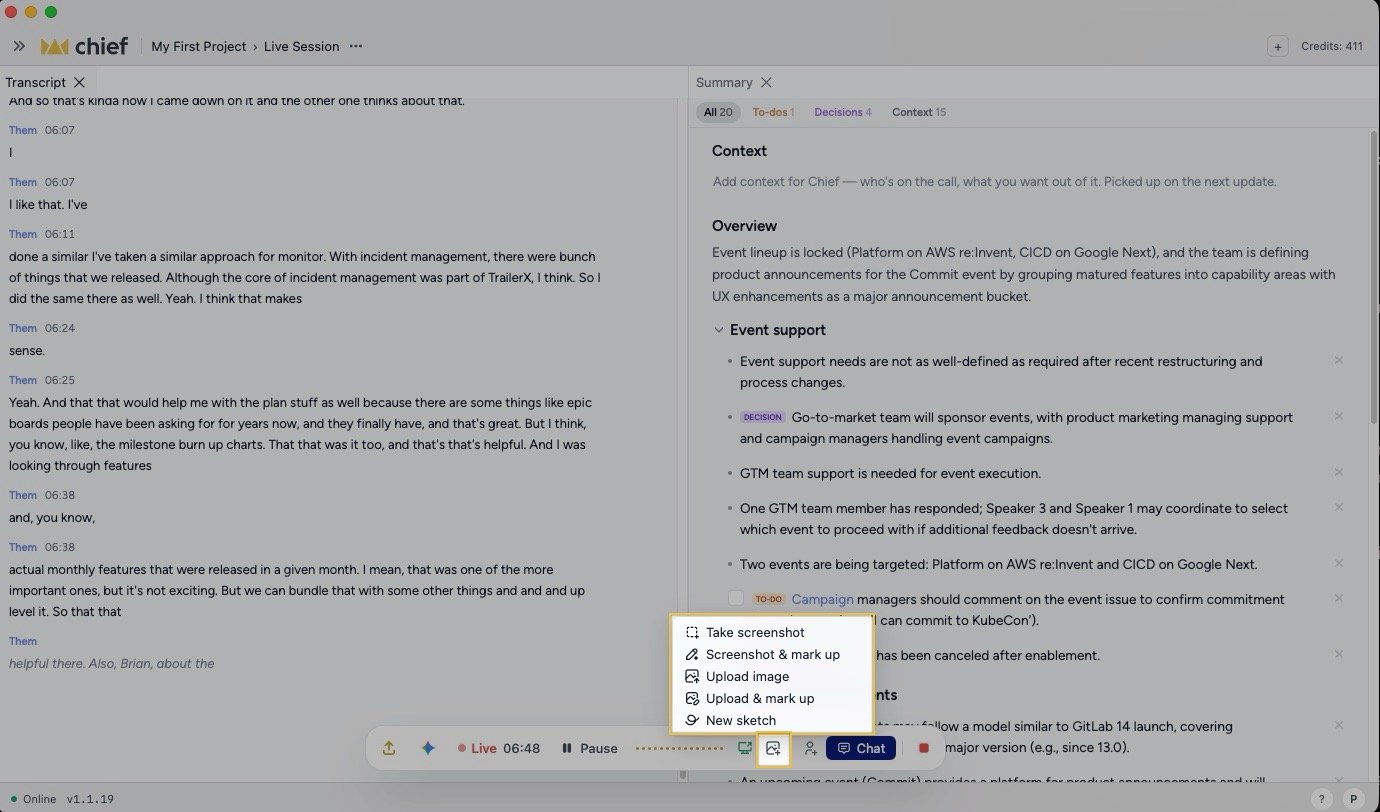
2. Click the **Add a screenshot, image, or sketch to the transcript** image button in the session controls.
3. Click **Take screenshot**.
4. Use the macOS screenshot tool to select what you want to capture.
Chief adds the screenshot after the latest transcript passage. Press **Esc** while selecting an area if you want to cancel.
## Mark up a screenshot or image
Choose **Screenshot & mark up** to capture your screen and open the visual editor before adding it. Choose **Upload & mark up** to annotate an existing image instead. Add your marks, then save the result to the transcript.
You can also choose **New sketch** when you want to explain an idea on a blank canvas instead of capturing your screen.
## Upload, paste, or drag an image
Use any of these paths during the session:
* Click the image button, then click **Upload image** and choose one or more files.
* Copy an image, click inside the **Transcript** panel, and press **Cmd-V** to paste it directly.
* Drag image files onto the **Transcript** panel and drop them when **Drop image to add it here** appears.
Chief accepts PNG, JPEG, WebP, and GIF files up to 10 MB each. Images are visible to people who [join or watch the Live Session](/help/meetings-live-sessions/sharing-joining-a-live-session) and are included when you [send the session to an AI agent](/help/meetings-live-sessions/sending-a-live-session-to-an-ai-agent).
**Important:** Only the host can add or remove images, and only while the Live Session is recording. The transcript becomes read-only after the session ends.
## Remove an image
Find the image in the transcript and click its remove control before the Live Session ends. If Chief cannot remove it, the app shows **Could not remove the image from the session. Please try again.**
## FAQ
Images can only be added during an active Live Session. Start a new session if you need to capture more visual context, or [upload an existing transcript](/help/meetings-live-sessions/uploading-an-existing-transcript) if your source is transcript text rather than an image.
Confirm the file is a PNG, JPEG, WebP, or GIF and no larger than 10 MB. Other formats show **Only PNG, JPEG, WebP, and GIF images can be added to the transcript.**
Chief anchors it at the current transcript tail, after the latest finalized passage. Adding an image also returns the transcript to the newest content if you had scrolled upward.
## Take a screenshot
1. Start a Live Session in the [Chief Live Sessions App](/help/meetings-live-sessions/starting-a-live-session).
2. Click the **Add a screenshot, image, or sketch to the transcript** image button in the session controls.
3. Click **Take screenshot**.
4. Use the macOS screenshot tool to select what you want to capture.
Chief adds the screenshot after the latest transcript passage. Press **Esc** while selecting an area if you want to cancel.
## Mark up a screenshot or image
Choose **Screenshot & mark up** to capture your screen and open the visual editor before adding it. Choose **Upload & mark up** to annotate an existing image instead. Add your marks, then save the result to the transcript.
You can also choose **New sketch** when you want to explain an idea on a blank canvas instead of capturing your screen.
## Upload, paste, or drag an image
Use any of these paths during the session:
* Click the image button, then click **Upload image** and choose one or more files.
* Copy an image, click inside the **Transcript** panel, and press **Cmd-V** to paste it directly.
* Drag image files onto the **Transcript** panel and drop them when **Drop image to add it here** appears.
Chief accepts PNG, JPEG, WebP, and GIF files up to 10 MB each. Images are visible to people who [join or watch the Live Session](/help/meetings-live-sessions/sharing-joining-a-live-session) and are included when you [send the session to an AI agent](/help/meetings-live-sessions/sending-a-live-session-to-an-ai-agent).
**Important:** Only the host can add or remove images, and only while the Live Session is recording. The transcript becomes read-only after the session ends.
## Remove an image
Find the image in the transcript and click its remove control before the Live Session ends. If Chief cannot remove it, the app shows **Could not remove the image from the session. Please try again.**
## FAQ
Images can only be added during an active Live Session. Start a new session if you need to capture more visual context, or [upload an existing transcript](/help/meetings-live-sessions/uploading-an-existing-transcript) if your source is transcript text rather than an image.
Confirm the file is a PNG, JPEG, WebP, or GIF and no larger than 10 MB. Other formats show **Only PNG, JPEG, WebP, and GIF images can be added to the transcript.**
Chief anchors it at the current transcript tail, after the latest finalized passage. Adding an image also returns the transcript to the newest content if you had scrolled upward.